Year: 2010

Laptop power usage

I just got a digital wattmeter. Had no idea about these until Google PowerMeter, but now, they’re all the rage. Mine’s a pretty simple model and all  I plan to do with it is play around with a few household gadgets.

n67hh-small

My first target, obviously, was my Dell Latitude E5400. The statistics are interesting:

Power … when…
0.3W Laptop is switched off. The adapter must be consuming the power
1.3W Laptop is on standby.
12W The lid is closed, and no applications are running.
18.5W The laptop is on, the lid is open, and no applications are running
25W The laptop is writing to the hard disk
34W One CPU is fully utilised
41W Both CPUs are fully utilised

Looks like the display and hard disk each consume about 6.5 watts each, while the CPU consumes a whopping 15 + 7 = 22 watts.

One interesting observation is that the colour of the display doesn’t make much of a difference. From my CRT monitor days, I’d remembered that a black screen consumes less power, and is less likely to wear the screen off. So my desktop background has always been black, and most of my applications use a black theme. But it turns out that on LCDs, it makes absolutely no difference. A full white screen uses the same power as a full black screen. So I’ve really been wasting my time the last 9 years. (There is a good reason to have a black screen, sometimes – it’s much easier on the eyes when reading without lights.)

Another lesson was that turning off the wireless had no effect whatsoever. (It worked quite well for my Blackberry, though. Increased the battery life quite a bit. I thought the same might apply for laptops, but looks like it doesn’t.)

I’ll do an audit of some of my home appliances and post it out here. Wonder if there’s a repository of power usage for appliances…

Command line alarm

When I’m in front of my laptop, I usually forget the world around. Sadly, the world around has important things that need to get done on time. Like eating medicines, turning off the washing machine or the hob, etc.

The one thing I’ve been lacking on my machine was a simple alarm system. I’d like to set an alarm to remind me to do something in 5 minutes, for example. And it should be dead simple to set up.

After hunting around a fair for freeware to do this, I’ve finally settled on writing this tiny piece of Visual Basic code.

Set WshShell = CreateObject("WScript.Shell")
If WScript.Arguments.length < 2 Then
  WScript.Echo "Usage: alarm <time-in-minutes> <message>"
Else
  WScript.Sleep WScript.Arguments.Item(0) * 60 * 1000
  msg = ""
  For i = 1 to WScript.Arguments.Count - 1
      msg = msg + WScript.Arguments.Item(i) + " "
  Next
  WshShell.Popup msg, -1, "Alarm", 64
End If

I’ve saved this as “alarm.vbs” somewhere in my path. When I need to set an alarm, I just type

alarm 5 Turn off the hob

This pops up a window in 5 minutes with the alarm:

An informational popup window saying Turn off the hob

This turned out to be a life-saver yesterday. I had to catch a flight at the Bangalore airport, and traffic is notoriously bad. To be on the safe side, I set up the following:

alarm 25 Catch the flight
alarm 30 You really need to go now
alarm 35 You've missed the flight

Turned out to be a wise thing. I ignored the first alarm. On the second, I said “OK, OK, just 1 minute…” and it really took the third alarm to get me going. Just barely made it to the flight.

Portable Apps

I’m totally hooked to portable apps now. You don’t need admin rights to install them. You can run them off a USB stick. They won’t make your machine slower. All the reasons not to install an application vanish.

PortableApps.com is a good starting point. For what it’s worth, here are my portable apps by category (most used on top).

Platforms

  • Firefox. If you’re using IE6, please die. Lack of admin access is no longer an excuse.
  • Cygwin brings you UNIX commands to Windows.
  • Portable Ubuntu run Ubuntu as a window in Windows.

Tiny utilities

  • GDI++ replaces the Windows font engine with a Mac-line rendering. Looks cool.
  • Clip is a command line tool that copies to clipboard. “dir | clip” copies the file listing to the clipboard. Outrageously useful.
  • PicPick takes screenshots of the screen, windows, regions, whatever. And you can edit them too.
  • uTorrent downloads torrents.
  • WinDiff compares two files and tells you the difference.
  • AlwaysOnTopMaker makes any window stay on top of other windows.
  • DiskTT tells you your hard disk (or USB stick) speed.
  • WinHTTrack downloads websites.
  • AllChars lets you type special characters like ½ by type Alt-1-2 or “ by Alt-`-`. It’s shockingly intuitive.
  • Restoration lets you undelete permanently deleted files.
  • Windirstat tells you what’s taking up space on your disk.
  • Sysinternals is a bunch of system monitoring utilities.
  • Virtual CD-ROM mounts .ISO files. You can use .ISO files without burning them.
  • Autostitch stitches together photos to create panoramas.

Media

  • VLC plays any audio or video file.
  • TightVNC lets you log into other machines like a remote desktop./li>
  • Audacity lets you record and edit audio.
  • CamStudio lets you record video (screen capture).
  • VirtualDub lets you edit video.
  • MediaCoder converts audio and video from any format to another.
  • GIMP is like Photoshop. You can edit pictures.
  • Inkscape lets you edit vector graphics.

Servers

  • XAMPP installs Apache, MySQL, PHP and Perl at one shot.
  • App Engine is Google’s freemium platform for app hosting.
  • Persevere is a RESTful JSON app server that runs on Java.
  • Tomcat is a JSP server.
  • nginx is a fast web server
  • CouchDB is a RESTful JSON app server that runs on Erlang.

Development tools

Let me repeat:

  1. You don’t need admin rights to install these.
  2. You can run them off a USB stick.
  3. They won’t make your machine slower.

There’s really no reason whatsoever not to have them on a USB stick at least. They’re cheap.

SSH Tunneling through web filters

You can defeat most web filters by spending around 8 cents/hr 0 cents/hr on Amazon EC2. (It’s usually worth the money. It’s a fraction of the cost a phone call or a sandwich. And I usually end up wasting that money anyway on calling someone or eating my way out of the misery of corporate proxies.)

Most web filters and proxies block all ports except the HTTP port (80) and the HTTPS port (443). But it’s used to carry encrypted traffic, and, as Mark explains:

since all the traffic that passed through the tunnel is supposed to be SSL encrypted (so as to form an unhindered SSL session between the browser and the HTTPS server), there are little or no access controls possible on such a tunnel

That means web filters can’t really block HTTPS traffic. So we can redirect web traffic to a local HTTPS server, and set up a server outside the firewall that redirects them back to the regular servers.

Putty will be our local HTTPS server. Amazon EC2 gives us a server outside the firewall.

So here’s a 16-step recipe to bypass your web filter. (This is the simplest I could make it.)

In Steps 1-7, we’ll launch a server on Amazon EC2 with 2 tweaks. Step 1 enables Port 443, and step 6 re-configures SSH to run on Port 443 instead of on Port 22. (Remember: most proxies block all ports other than 80 and 443). Alestic’s article on how to Automate EC2 Instance Setup with user-data Scripts and this thread on running SSH on port 443 are invaluable.

In Steps 8-13, we’ll set up Putty as our local HTTPS server. Read how to set up Putty as a SOCKS server and how to use Putty with a HTTP proxy. All I did was to combine the two.

In steps 14-16, we’ll configure the browser to use the Putty as the SOCKS server.

Ingredients

  1. Amazon AWS account (sign up for free – you won’t be charged until you use it)
  2. Putty (which may be available on your Intranet, if you’re lucky)

Directions

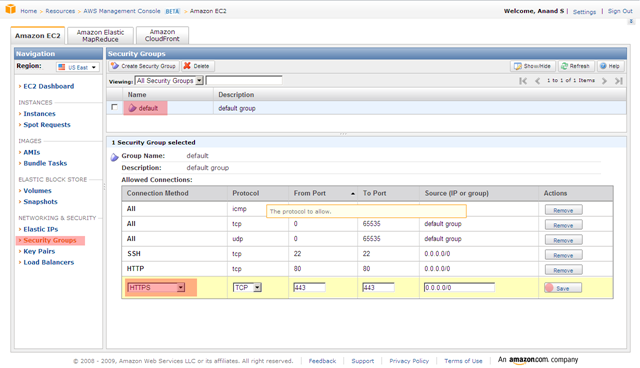
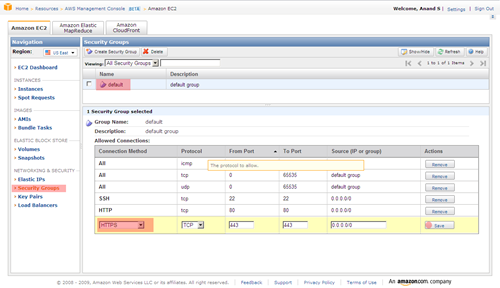
  1. On the AWS EC2 Console, click on Security Groups and select the default security group. At the bottom, select HTTPS as the connection method, and save it.
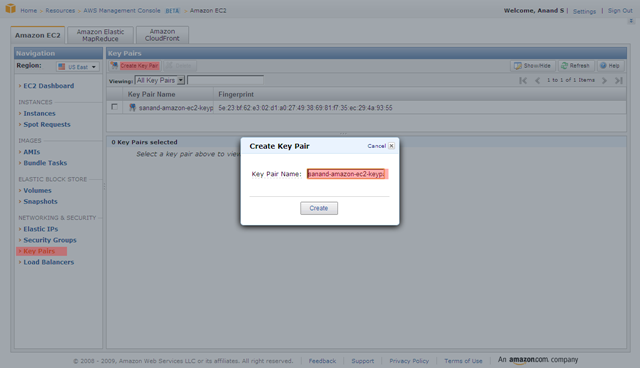
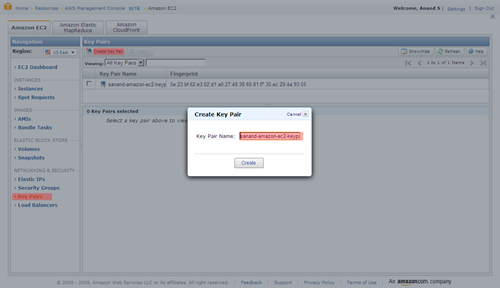
  2. Click on Key Pairs, select Create Key Pair and type in some name. Click on the Create button and you’ll be asked to download a key file. Save it somewhere safe.
  3. Run PuttyGen (it comes with Putty), click Load and select the key file you just saved. Now click on Save private key and save it as privatekey.ppk.
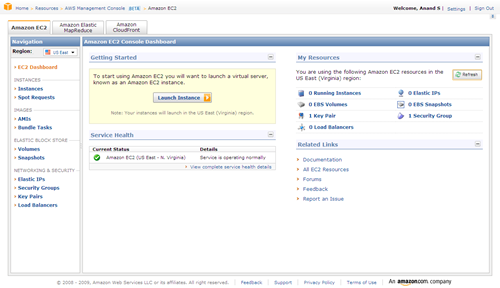
  4. Back on the AWS EC2 Console, click on Launch Instance.
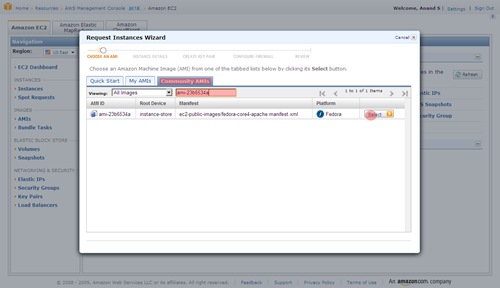
  5. Select Community AMIs and find ami-ccf615a5. It’s a Ubunty Jaunty 9.04 instance that’s been customised to run scripts passed as user-data. You may pick any other alestic instance. (The screenshot below picks a different instance. Ignore that.)
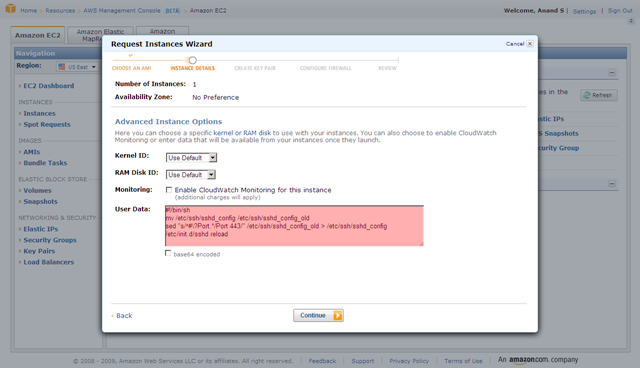
  6. Continue until you get to Advanced Instance Options. Here, copy and paste the following under User Data. Do not make a mistake here!
    #!/bin/bash
    mv /etc/ssh/sshd_config /etc/ssh/x
    sed "s/^#\?Port.*/Port 443/" /etc/ssh/x > /etc/ssh/sshd_config
    /etc/init.d/ssh restart

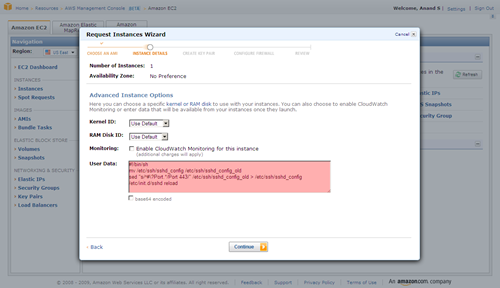
  7. Keep pressing Continue and Launch the instance. Once launched, click on “Instances” on the left, and keep refreshing the page until the status turns green (running). Now, copy the Public DNS of the instance.
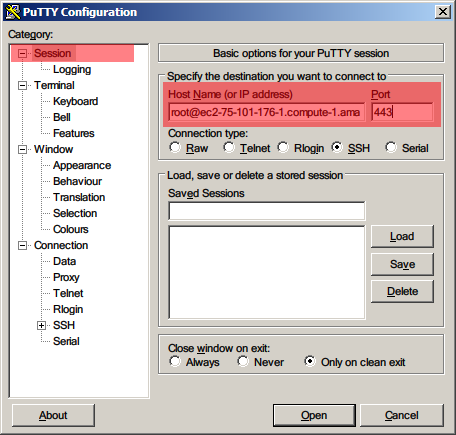
  8. Run Putty. Type in root@<the-public-DNS-you-just-copied> as the host name, and 443 as the port
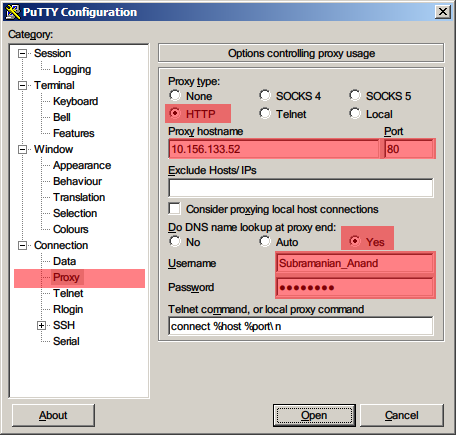
  9. Under Connection > Proxy, set HTTP as the proxy type. Type in the Proxy hostname and Port you normally use to access the Internet. Select Yes for Do DNS name lookup at proxy end. Type in your Windows login ID and password.
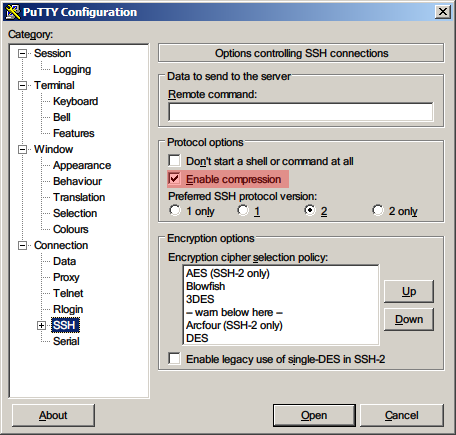
  10. Under Connection > SSH, select Enable Compression.
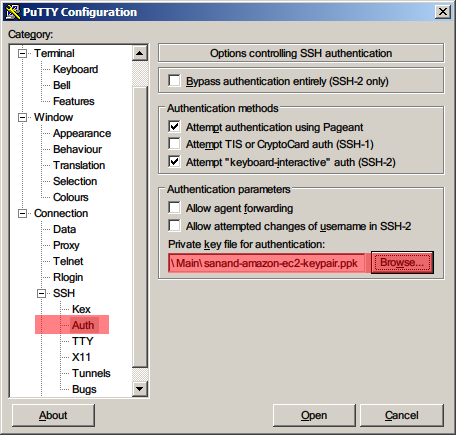
  11. Under Connection > SSH > Auth, click Browse and select the privatekey.ppk file you’d saved earlier.
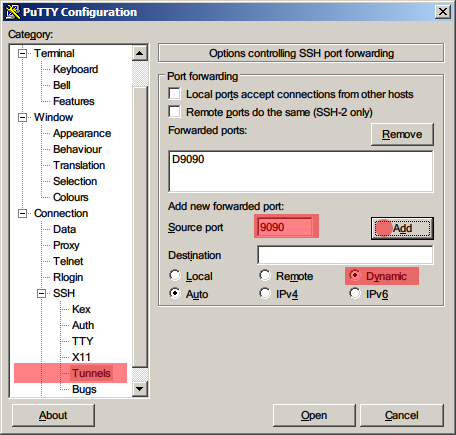
  12. Under Connection > SSH > Tunnels, type 9090 as the Source port, Dynamic as the Destination, and click Add.
  13. Now click Open. You should get a terminal into your Amazon EC2 instance.
  14. Open your Browser, and set the SOCKS server to localhost:9090. For Internet Explorer, go to Tools – Options – Connections – LAN Settings, select Use a proxy …, click on Advanced, and type localhost:9090 as the Socks server. Leave all other fields blank.
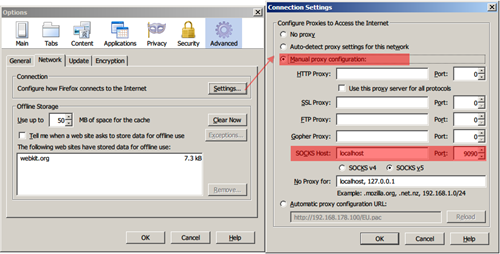
  15. For Firefox, go to Tools – Options – Advanced – Network – Settings and select Manual proxy configuration. Set the Socks Host to localhost:9090 and leave all other fields blank.
  16. Also, go to URL about:config, and make sure that network.proxy.socks_remote_dns is set to true.

That’s it. You should now be able to check most blocked sites like Facebook and YouTube.

Those who favour the command line may want to automate Steps 1-7 by downloading Amazon’s EC2 API tools. EC2 API tools work from behind a proxy too. The commands you’ll need to use to setup are:

set EC2_HOME=your-ec2-home-directory
set EC2_CERT=your-ec2-certificate
set EC2_PRIVATE_KEY=your-ec2-private-key
ec2-add-keypair mykeypair
ec2-authorize default -p 443
set EC2_JVM_ARGS=-DproxySet=true -DproxyHost=yourproxy \
-DproxyPort=yourport -Dhttps.proxySet=true \
-Dhttps.proxyHost=yourproxy -Dhttps.proxyPort=yourport \
-Dhttp.proxyUser=yourusername -Dhttps.proxyUser=yourusername \
-Dhttp.proxyPass=yourpassword -Dhttps.proxyPass=yourpassword
ec2-run-instances ami-ccf615a5 --key mykeypair --user-data-file your-startup-file-containing-lines-in-step-6

You can go further and use any software (such as Skype) if you install FreeCap. More details are in this article on Secure Firefox and IM with Putty.

Linux users may want to check out ProxyTunnel and this article on Tunneling SSH over HTTP(S).

Update: Follow-ups on hacker news comments, twitter, delicious and digg.